How to Master the BBQ Snake Method: Setup and Best Times to Use It
Do you want to cook low and slow on the BBQ, but you are not sure how to start? The BBQ snake method is an easy way to extend your cook time and keep your temperature consistent. Perfect for that home smoked bacon, pulled pork, brisket, or BBQ ribs!
The BBQ snake method is great for charcoal kettle BBQs. We are big Weber fans and have 2 Weber BBQ kettles!
What is the BBQ Snake Method?
The BBQ snake method is a simple way to arrange charcoal briquettes in a continuous line in your kettle BBQ (semi-circle or full circle depending on how long you want to cook for). You light one end, and it slowly creeps along the line. Think of it as a slow-burning fuse of continuous temperature.
As the fire travels along the “snake,” it provides consistent, low heat. It is ideal for kettle-style grills.
The idea behind the BBQ snake method is that you can control the environment to get a perfect balance between oxygen and fuel to maintain a clean burning fire for a long period of time without adding fuel or making major adjustments.
When to Use the BBQ Snake Method
The BBQ snake method is perfect for long, low-and-slow cooks when you don’t want to babysit your BBQ.
The snake method is therefore great for cuts of meat with lots of connective tissue and/or intramuscular fat. The low temperature over a long time converts the collagen in connective tissue to gelatine and renders the fat properly. This creates a luscious mouthfeel and juicy meat!
The BBQ snake method is great for cooking at temperatures between 220 and 285°F (105 and 140°C). We typically stay as close to 250°F (120°C) as possible for most cooks.
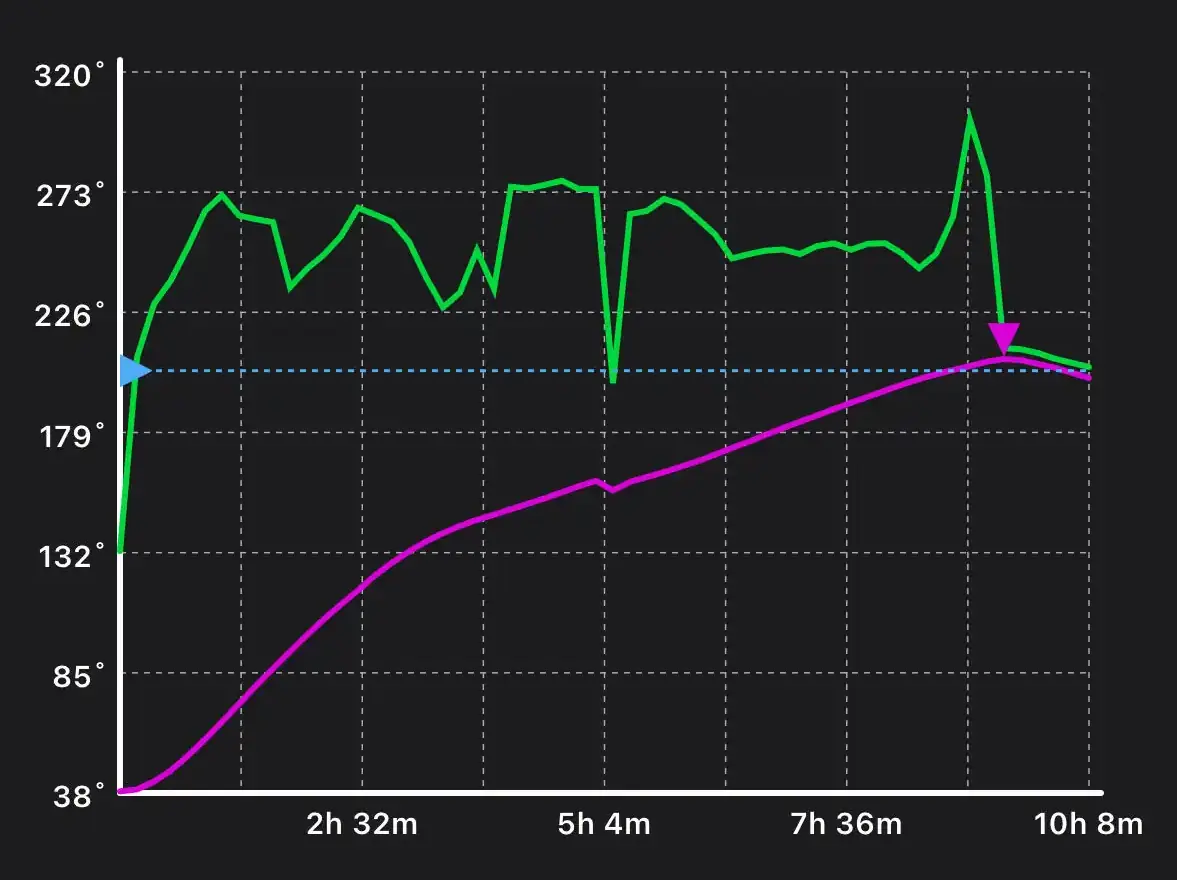
The graph shows one of our recent nearly 10 hour cooks using the BBQ snake method. The green line is the ambient temperature within the kettle grill. Every time the temperature dips is when the grill lid was opened. The purple line shows the internal meat temperature (this was a pork butt roast). The blip in the middle of the cook was when we wrapped the meat.
So typically, this method can be a great way of cooking large cuts of meat that usually require braising. Things like brisket, ribs, pork shoulder, pork belly or ribs (beef or pork)!
Also, if you want to infuse smoke flavor into the dish, the BBQ snake method is perfect. The dish doesn’t always have to be finished over the fire. You can smoke it for a while, and then cut it up for stews. Oxtail stew is an excellent example of how we get some smoke flavor in the pot!
When it comes to weather, you can cook using the snake method in any weather! If it is super cold, (below -10°C or 14°F) you might need to adapt your snake and add a second row on top (see below).
Tools and Charcoal Options
Setting up your BBQ for the snake method does not require much more than any other BBQ set up.
- You will need your BBQ of course. Be it a kettle grill or any other grill. Your snake can be round or square. A kettle grill will allow for more even heat, but even in a square BBQ you can make it work.
- Charcoal! What is a BBQ without charcoal! Briquettes vs lump charcoal? Charcoal briquettes are the better option, as they are more consistent in size and will make for easier stacking.
Our preference is Weber briquettes. We have tested a few brands that are available here but find that Weber briquettes provide the most consistent, highest temperature and best quality briquettes.
- A chimney, fire starter of sorts (we like to use egg cartons) and a lighter to start your fire and get a few briquettes lit to start your BBQ snake with.
- Tongs to move the lit briquettes in place when they are ready!
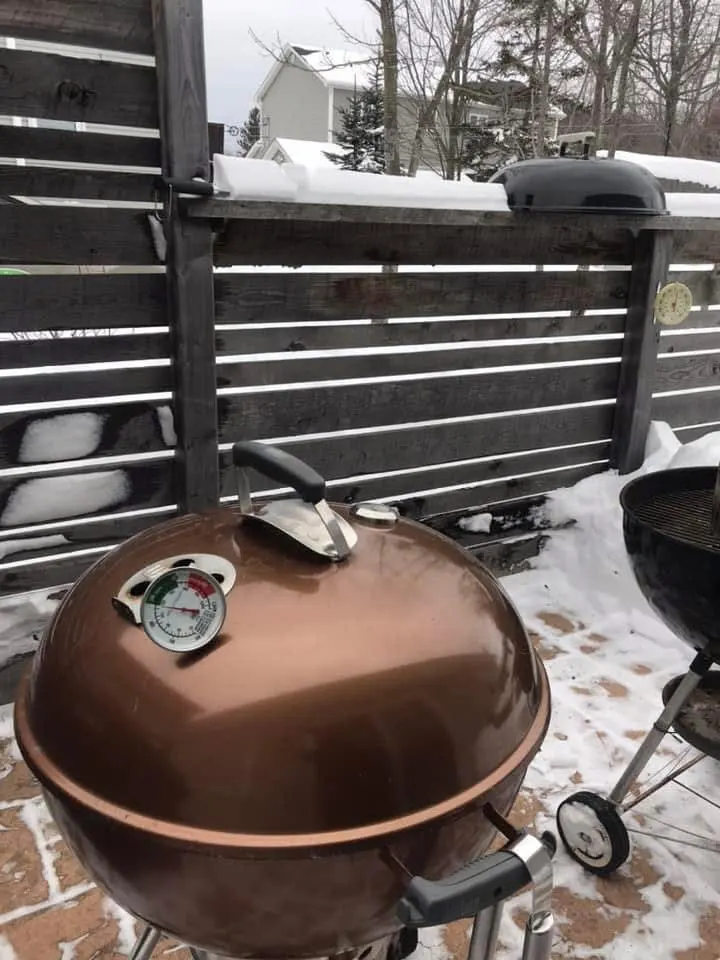
- And a thermometer of course to monitor the temperature. Ideally you want something to monitor the ambient temperature as well as the internal meat temperature.
There are lots of options available out there. Our preferred one is the Meater® wireless thermometer. It costs a little bit more, but it is oh so worth it! It measures both internal and ambient temperature and connects to an app on your phone where you can see how your cook is performing. Send you notifications if temperature changes, when the cook is ready, etc. Takes the guesswork out of cooking and allows you to step back for a bit!
- A deep pan for holding water is optional, but preferred! A pan with water helps regulate temperature and helps with adding moisture to the atmosphere.
How to set up your BBQ snake:
How to set up your BBQ snake for the perfect cook? This is pretty simple!
Step 1:
Prepare and clean your BBQ. Remove ash from previous cooks. Leftover ash can block vents and impede airflow.
Step 2:
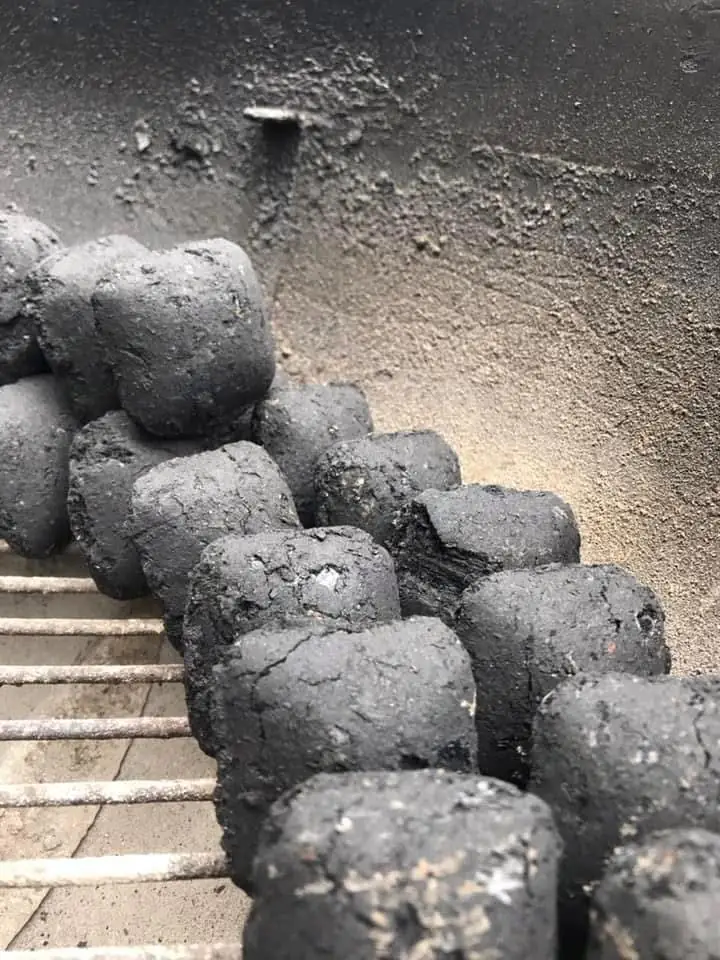
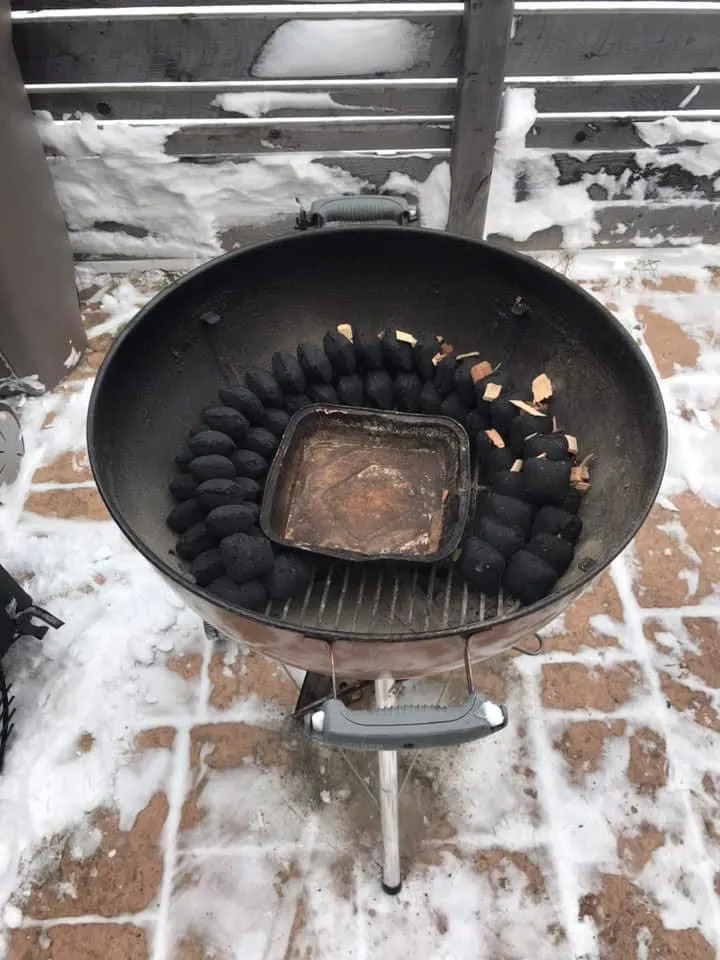
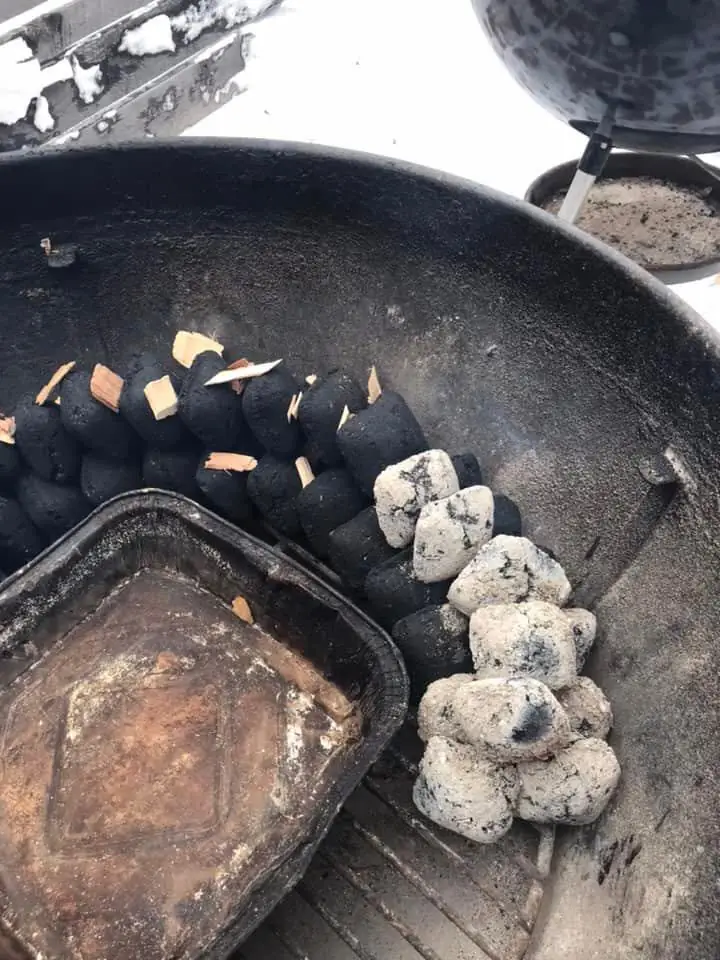
Arrange briquettes in a circle “snake” around the perimeter of the kettle. You do this by making 2 rows of charcoal around the edge of the kettle. It’s like playing dominoes. It is very important to keep them tightly packed, almost upright and as consistent as possible! Make a 3rd row on top. For very cold temperatures (below -10°C or 14°F) when you struggle to get the kettle up to temperature, a 2nd row on top will raise the temperature for your cook. Do not complete the top row, leave space for 3 briquettes. Consistency in building your snake is important! Take your time, don’t rush it! A consistent fuel and air supply will create a consistent temperature.
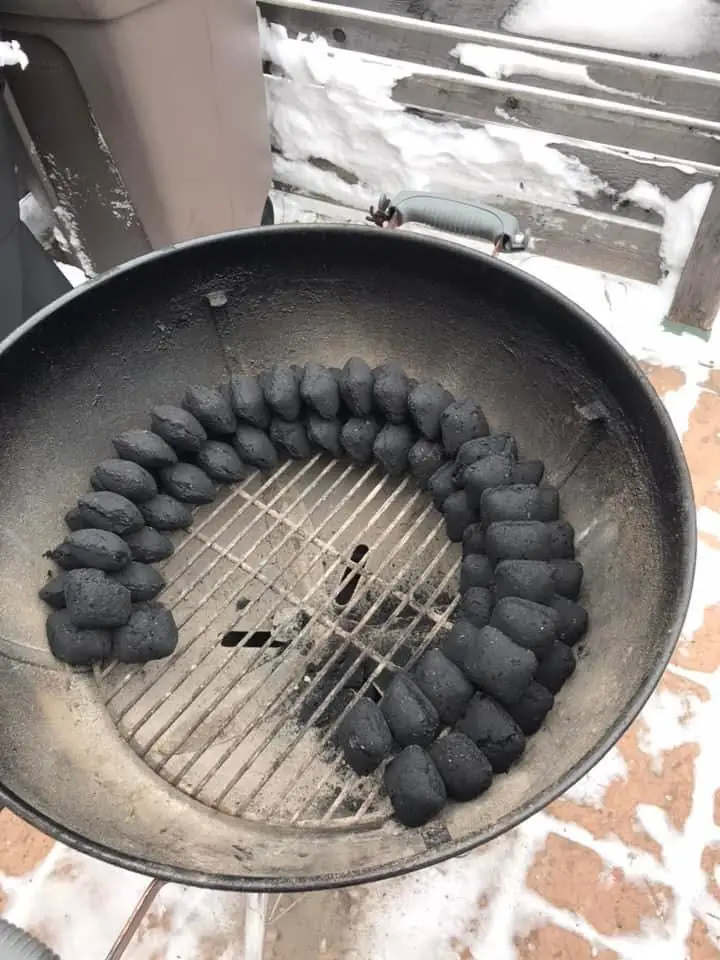
Depending on how long you are planning to cook, a half circle will give you approximately 5 hours, while an almost complete circle can give you up to 12 hours of cook time. If you need to cook for longer, you will need to extend your snake during the cook time, once some briquettes have burnt away. If your cook is shorter, rather make your snake longer to prevent running out of charcoal before the meat is cooked, once your cook is done close all the vents and the fire will die out. Any leftover briquettes can be used for the next cook.
Step 3:
Add wood chunks or chips for smoke. Spread a handful of wood chips along the length of the snake, enough for the first half of the cook. Add a small handful on the lit coal once the temperature has stabilized, just before adding the meat. Meat best absorbs smoke at the beginning of the cook, so you won’t need to go all the way around with the chips. Don’t add too much smoking wood as this can turn the meat bitter or over smoke it. A little goes a long way!
Step 4:
Light one end of the snake. You do this by placing 14 full briquettes in a chimney and lighting these. Once they are ashed over (completely white on the outside) you will place these at the start of your snake completing the top row, packing them snugly against the snake so they can start the fuse.
Step 5:
Add boiling water to a water tray/pan, not cold, and place it in the center of your snake. This helps keep temperature constant and adds some moisture to the atmosphere.
Step 6:
Get the kettle up to temperature:
With all vents open, put the lid on. If the temperature rises too quickly or too high, take some lit coal out, if you are not getting the desired temperature, add some more lit coal.
Remember that fine adjustments can be made during the cook by adjusting the top and bottom vents. We like to start by closing the bottom vent to keep the temperature from over shooting, keeping the top vent open to prevent the build up of unwanted smoke. Our bottom vent is usually 3/4 open and the top vent fully open.
If you throttle the fire too much, the fire will smolder giving you dirty smoke. If the temperature shoots up too high, rather take a few lit coals out.
Step 7:
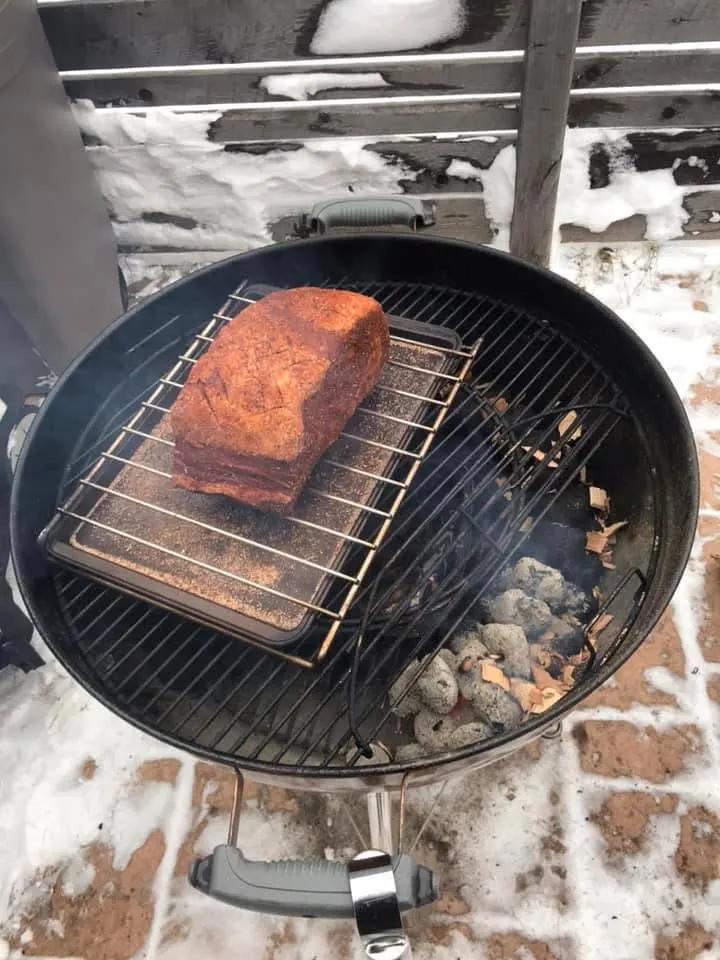
Add your meat to the BBQ. We like to use a baking sheet and grid to help keep direct heat away from the meat.
Step 8:
Control airflow and temperature. See below for managing heat with your kettle’s vents.
Monitor temperature making small adjustments and giving time for change, you might have to do small adjustments once or twice the entire cook.
How long until it gets to temperature ?
It usually takes about 30 minutes for the BBQ to come up to temp and stabilize, it may take longer if you need to make more adjustments. It is worth spending the extra time now as it will give you more stable temperatures and controlled smoke for the rest of the cook. Remember to close the lid quickly if you are working inside the BBQ as the extra air will quickly ignite more coal and spike the temperature!
Managing Heat and Vents
The top and bottom vent positions of the kettle control the temperature.
The top vent allows the smoke to escape creating space for air (oxygen) to come in through the bottom vent.
The bottom vent controls the influx of oxygen, which fuels the fire. A closed vent will suffocate your fire, while a wide open vent will allow lots of oxygen in, which means your fire will burn hotter and faster. The key is to have the right amount of airflow to maintain the correct size of fire to give a clean burning fire.
With the BBQ snake method, temperature is pretty easy to manage. You ideally want to keep your top vent opposite to where the snake is burning. This allows the heat and smoke to travel across the meat before leaving the kettle.
We like to keep the bottom vent about ¾ to fully open, allowing enough air in to let the fire burn. If the temperature does continue to rise this also allows enough adjustment to close the vent further to lower the temperature.
Every time you open the BBQ you will want to close it again as quickly as possible. The high volume of oxygen will cause the fire to burn quickly and will raise the temperature. To control that you will then have to smother it via vent control, and this can lead to dirty smoke.
Cooking Tips and Common Mistakes
Pack your charcoal as tight and consistently as possible standing nearly upright. Consistent fuel = consistent temperature!
Where and how much wood to add for smoke flavor:
Meat best absorbs smoke at the start of the cook, so place your wood chips or chunks at the start of your snake, depending on the length of cook enough for 4-5 hours is usually enough. Don’t add too much, as too much smoke can overpower the meat and taste bitter or sour. A little goes a long way!
Adding a water pan will help regulate temperature and add moisture. Place the water pan with hot water in the center of your snake.
Cook your meat over a roasting pan or baking sheet for indirect heat. This pan will deflect the heat and at the same time stop any drippings from dripping into the kettle and making a mess. Plus, sometimes you want to keep those juices!
Don’t use self igniting charcoal for the snake method. This charcoal is impregnated with ignition aids and until these chemicals burn off, you should not cook over it, as it could taint your meat.
The quality of briquettes will play a role in the temperature too, some burn hotter than others and some burn longer than others. We prefer the Weber brand as they burn hotter and longer than any of the others we have tried. You will need to see what your favorite brand of briquettes does and adjust from there.
If you are planning a very long cook, consider preparing the kettle BBQ snake the night before, that way when you get up before sunrise to start cooking you don’t need to play around with the charcoal briquettes. Just light it up and get started!
Example Cook Times and Internal Temperatures for Meat
As already explained above, the BBQ snake method is excellent for low and slow cooks. Some examples include
- Smoked Pork Ribs: 5-6 hours
- Smoked beef plate ribs 7-9 hours
- Pork Shoulder: 8-10 hours
- Brisket: 10-12 hours
- Bacon: ~4 hours
These times will vary depending on the size and thickness of the meat. Weather will also play a role (windy and rainy conditions, extreme cold or heat).
Always cook to Internal temperature and/or probe tenderness! Unfortunately, it is never easy to predict how long a cook will take.
If your oven allows for it, wrap the cooked meat tightly in foil after allowing it to cool down just a bit and keep it warm for a long rest (safe food temp and good serving temp is 150-160°F (65-70°C) you can cook the day before and hold the meat at this temperature until the next day. No guessing what time dinner will be served.
Keep this guide of internal temperatures handy. I have placed a guide for internal meat temperatures in my resource library. To get the password to access it, click here.
Recipes for Inspiration
We love low and slow cooks! Here are some of our favorite recipes:
- Homemade Smoked AIP Bacon that you can easily make AIP compliant (coming soon!)
- More recipes to follow….
Final Thoughts
What is your favorite BBQ low and slow recipe? Drop it in the comments, or better yet, invite us over for a visit! We’ll bring some side dishes!